Moss growing on your roof is more than a cosmetic issue. It is a silent threat to your roofing system. What starts as a small patch of green can gradually weaken shingles, trap moisture, and shorten your roof’s lifespan. Understanding how to remove moss from roof surfaces properly helps prevent expensive repairs and long-term structural damage. In damp or shaded areas, moss spreads quickly. It embeds itself between shingles and holds moisture against the roof deck. Over time, this constant dampness accelerates deterioration.
At USA Builders and Developers, we regularly inspect roofs affected by moss-related damage. Many homeowners underestimate the impact until leaks appear. This guide explains how moss forms, why removal matters, and how to eliminate it safely without harming your roof.
Understanding Roof Moss Growth
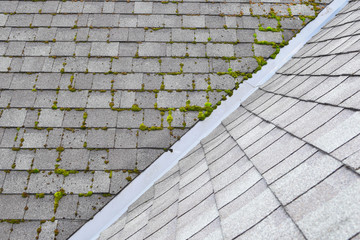
Moss thrives in cool, damp, and shaded environments. Roofs that receive limited sunlight, especially north-facing slopes, create ideal conditions for growth. Areas with heavy rainfall or high humidity are particularly vulnerable.
Unlike algae, moss has shallow root-like structures called rhizoids. These attach to shingle surfaces and anchor into the granules. Once established, moss acts like a sponge. It absorbs rainwater and holds it against the roofing material long after storms pass.
This constant moisture exposure can cause:
- Shingle lifting and curling
- Granule loss on asphalt shingles
- Wood rot beneath roofing layers
- Freeze-thaw damage in colder climates
- Mold and mildew development
As moss thickens, it wedges between shingles and forces them apart. This creates small gaps where water can seep underneath. Over time, this can compromise the roof deck and insulation.
Why Removing Moss Is Important
Many homeowners assume moss is just a cosmetic problem. In reality, it can cause significant structural damage over time. Moss acts like a sponge, it absorbs water and keeps your roof damp even after the rain has stopped.
Here’s why removing moss promptly matters:
- Prevents Roof Damage – Moss can lift and crack shingles, allowing water to seep underneath.
- Protects Your Investment – Roof repairs or replacements are expensive. Preventing moss growth saves you money.
- Improves Curb Appeal – A clean roof makes your home look well-maintained and attractive.
- Enhances Energy Efficiency – Moss can trap heat and moisture, affecting insulation and ventilation.
By taking proper care of your roof, you protect both your property’s beauty and its long-term durability.
How to Remove Moss from Roof: Step-by-Step Guide
Removing moss from your roof requires patience and care. Using harsh tools or chemicals can damage shingles, so it’s important to follow safe methods. Let’s go through each step carefully.
Step 1: Inspect Your Roof Condition
Before taking action, determine:
- Roof age
- Shingle material
- Level of moss coverage
- Existing damage
This determines the best approach.
Step 2: Prepare the Area and Gather Tools
Before you begin, protect surrounding plants and landscaping by covering them with plastic sheeting. Then, collect the necessary tools:
| Tools and Materials | Purpose |
|---|---|
| Soft-bristle brush | Gently removes moss without damaging shingles |
| Garden hose | For rinsing the roof surface |
| Eco-friendly moss remover | Kills moss spores and prevents regrowth |
| Safety ladder and gloves | Ensures safe access and handling |
| Protective eyewear | Shields eyes from debris or cleaner spray |
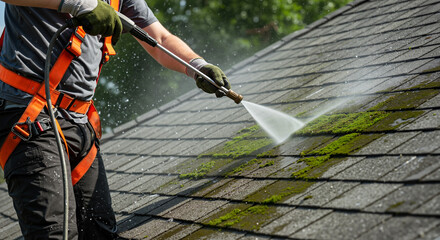
Avoid using a pressure washer, as high water pressure can damage shingles and push water under them, leading to leaks.
Step 3: Gently Brush Off the Moss
Using a soft-bristle brush, gently remove moss from the roof surface. Always brush downward, following the direction of the shingles.
Never scrub aggressively, doing so can break or loosen shingles. The goal is to remove the majority of the moss without causing damage to the roofing material.
Step 4: Apply a Moss Removal Solution
After brushing, apply a moss removal solution to kill any remaining spores. Choose a cleaner designed for roofs and safe for plants and pets.
Two popular options include:
- Commercial roof moss cleaners available at hardware stores.
- DIY solution: Mix one part white vinegar with one part water.
Spray the mixture evenly over the moss-affected areas and let it sit for 20–45 minutes. This process helps break down any leftover moss and prevents it from growing back.
Step 5: Rinse the Roof
Once the moss remover has done its job, gently rinse the roof using a garden hose. Avoid high pressure and ensure the water flows downward with the slope of the roof.
Rinsing removes dead moss and leftover cleaner residue. It’s also a good time to check your gutters for clogs and clean them if needed.
Step 6: Allow the Roof to Dry
Let the roof dry completely. When it’s dry, inspect it again for remaining moss patches. Some tough areas may require a second treatment. Keep in mind that the roof may appear slightly discolored immediately after cleaning, but it will regain its natural look after a few rainfalls.
Step 7: Dispose of Moss Properly
After cleaning, collect and dispose of all moss debris. Avoid leaving it near your home or yard, as moss spores can spread and regrow.
Preventing Moss from Returning
After removing moss, prevention becomes key to keeping your roof in good condition. Below are practical tips to keep moss away:
| Prevention Method | How It Helps |
|---|---|
| Trim overhanging branches | Reduces shade and improves air circulation |
| Clean gutters regularly | Prevents water pooling on roof edges |
| Install zinc or copper strips | Metal ions help inhibit moss and algae growth |
| Schedule annual roof inspections | Detects moss early and prevents damage |
| Maintain roof ventilation | Keeps roof dry and discourages moss growth |
Routine maintenance is the best long-term solution for a moss-free, healthy roof.
When to Call the Experts
If your roof has extensive moss coverage, or if it’s slippery or steep, don’t take the risk yourself. Professional contractors can handle these situations safely and effectively.
USA Builders and Developers provide expert roof cleaning, inspection, and maintenance services. Their team uses eco-friendly solutions and safe cleaning methods designed to preserve roofing materials while eliminating moss effectively.
Professional service ensures:
- No shingle damage
- Thorough moss removal
- Early leak detection
- Long-term prevention treatments
- Extended roof lifespan
Benefits of Professional Roof Moss Removal
Choosing professional help provides peace of mind and lasting results. Here’s why homeowners trust companies like USA Builders and Developers:
- Safe Cleaning Techniques – No harsh pressure washing or shingle damage.
- Eco-Friendly Treatments – Effective solutions safe for your home and landscaping.
- Comprehensive Roof Inspection – Detects early signs of leaks or damage.
- Long-Term Protection – Preventive treatments to keep moss away.
- Enhanced Roof Longevity – Extends the life of your roof with proper care.
What is the best Roof Moss Killer to use?
Roof Moss Killer should be made specifically for roofing materials and be safe for shingles. Avoid harsh chemicals, and choose a product that clearly states it removes moss without damaging the roof surface.
Can I remove moss from my roof without chemicals?
Yes, light moss can be removed with gentle brushing and water. However, for thicker growth, a treatment product is usually more effective and prevents moss from returning quickly.
How long does it take for moss to come off after treatment?
Most treatments begin working within a few days, but it may take one to two weeks for all the dead moss to wash away naturally with rain.
Is roof moss dangerous if ignored?
Yes, untreated moss can trap moisture, damage shingles, and eventually lead to leaks and wood rot if not removed in time.
When should I call a professional for moss removal?
You should contact a professional if the moss covers a large area, the roof is steep, or you notice signs of leaks or loose shingles.
Final Thoughts
Learning how to remove moss from roof surfaces properly protects your home from long-term damage. Moss may appear harmless, but it gradually weakens shingles, shortens roof lifespan, and increases the risk of leaks. Routine maintenance prevents expensive repairs. Safe cleaning methods preserve roofing materials. Early intervention protects structural integrity.
If you prefer expert care and long-lasting protection, USA Builders and Developers provide professional roof cleaning and maintenance services designed to keep your home safe, dry, and moss-free.
Have Questions? Call Us Now!
We’re here to help—quick answers, friendly service, anytime you need!